A beginner's guide to digital piano recording (with Linux)
I've recently learned the hard way how to record my digital piano. I'd like to share my setup in case it helps save anyone else some of the time and hassle it took for me.
I personally use Linux Mint, although most of this should be transferrable to any other operating system. I'll explain why I started by recording the audio through the headphone jack, using an Audiobox GO audio interface - and switched to recording MIDI through the USB port.
But first, I'll jump straight to what my current setup is and how it sounds, in case you want the tl;dr!
My working setup (MIDI)
- Roland FP-10 digital piano
- USB-B to USB-C cable (this one)
- Linux Mint laptop
- Pianoteq software - for recording MIDI and exporting audio
- Android phone - for recording the video of me playing (without audio)
- OpenShot Video Editor - for merging the video and audio back together
I found this setup fairly straightforward to get working, except for the details below. But first, here's how it actually sounds.
How it sounds
One I recorded earlier (Clubbed to Death by Rob Dougan, arrangement by Maxence Cyrin). Output with the Steinway Model D virtual grand piano from Pianoteq. (I'm self-taught and I only started playing in my 40s, so please try to look past the actual standard of playing!) More examples here.
How to get it working
Realtime scheduling
I needed to configure Linux to enable Realtime (RT) scheduling. To do this, I followed this guide.
So I have a file at /etc/security/limits.d/audio.conf with these two lines uncommented:
@audio   -  rtprio     95
@audio   -  memlock    unlimited
And I setup the audio group and added my user to it. Please see the post on jackaudio.org for the full details.
Pianoteq
To record the MIDI and play and export it with different virtual pianos, I tried and subsequently decided to purchase Pianoteq Stage. It costs a fair bit, but they have a free trial so you can decide if you think it's worth it. For me, I really love the sound of the Steinway Model D grand piano in particular (that's the one I used for the recording above) and I haven't regretted it.
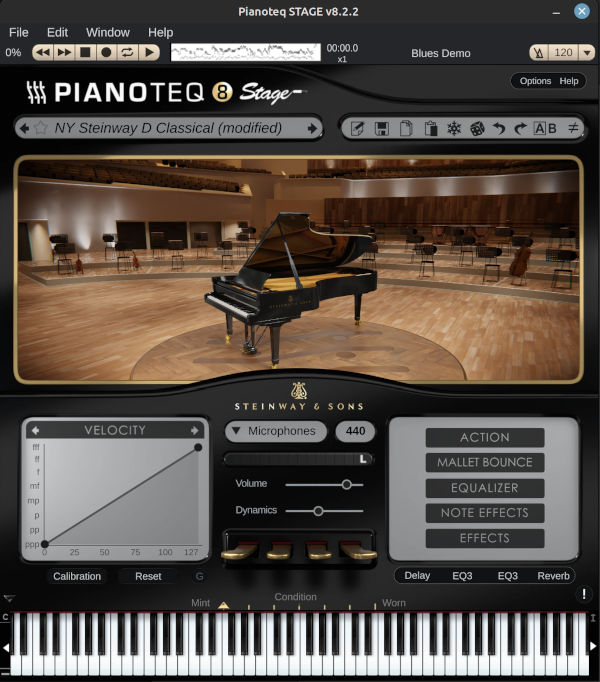
To configure Pianoteq, I followed a tip I read here: When you first load it up, go to Edit --> Preferences --> Devices --> Active MIDI inputs and check Listen to all MIDI inputs.
My audio output is set to: HDA Intel PCA, ALC256 Analog; Direct hardware device without any conversions.
Now when I have the piano plugged into the USB port of the laptop, I have the piano switched on, and I have Pianoteq open, it "just works" and I can see the keys I'm pressing and hear how it sounds with my selected virtual piano and settings.
Update: Another tip, which I missed earlier myself. Do make sure you calibrate Pianoteq for your piano (the "Calibration" button, on the left, above the keys). I belatedly did this and it sounds much better now!

Pianoteq STAGE on Linux Mint
OpenShot Video Editor
I use OpenShot to combine the video recorded on my phone with the audio recorded via MIDI. OpenShot can be a bit unintuitive and even a bit buggy, but I've managed alright with it since I made sure I was running the latest version downloaded from the OpenShot website.
I was worried at first that it would take me ages to sync the audio and video up exactly, but thankfully I realised that I didn't need to be super-accurate - as long as you hear the note around the time you press the key, it looks normal enough.
The final thing I needed to learn was which export type to select. For my camera (OnePlus Nord 3) which takes 1080p video, good options are e.g. 'FHD 1080p 29.97 fps (1920x1080)' for landscape videos or 'FHD Vertical 1080p 29.97 fps (1080x1920)' for portrait (depending on how high quality you want).
My previous setup (audio)
Before I realised MIDI was the way to go for me, I tried recording the actual audio output via the headphone jack. This is basically because I had a naive view of MIDI. I had briefly tried recording MIDI through Roland's Piano Partner 2 phone app via Bluetooth and it recorded badly and sounded bad. I didn't realise how powerful and accurate MIDI could be if I set it up properly. Now I think of MIDI a bit like a computer program I can use to re-generate the audio. I can run the 'program' as many times as I like and change how it sounds.
You can even edit the MIDI to tweak things or fix mistakes if you like. I've done this for little bits here and there when it doesn't feel too much like cheating! ;) I use a free online MIDI editor called Signal.
However, my previous setup did have one big advantage over my MIDI setup: I could record directly on my phone. I didn't need to sync up the video and audio in post-production - I didn't need to use a laptop at all. However, I much prefer the resulting sound when I do go to that effort - and the flexibility to be able to change how it sounds afterwards - so for me, it's worth it.
Before I learned that though, here is how I recorded the audio:
- Roland FP-10 digital piano
- 3.5mm to 6.35mm TRS stereo audio cable (this one)
- AudioBox GO audio interface
- Powered USB-C hub (this one) - to power the AudioBox GO and connect it to my phone
- Android phone
- Open Camera app - a free camera app which lets you select an external audio source
It took me a lot of research to even figure out that I needed each of these things. Then there was one more key thing I needed to learn in order to get it working:
Open Camera
I needed to set the audio channel to "Mono" in the Open Camera video settings (Settings -> Video settings -> Audio channels). I found this counter-intuitive at first, because I was thinking "I want to record stereo, not mono". But when it's set to stereo, it expects stereo input - and results in the audio only coming through in one ear!
Summary
That's all the key points I can think of, for how I now record my digital piano using MIDI - and how I previously recorded it using audio. I hope you might have found it useful. Happy recording!
