Turning hacks into products - lessons from Let's Code!
Phase 0: The idea
You’ve probably been hearing quite a lot lately about children learning to code. Interest in the topic has exploded recently, with initiatives such as the Hour of Code and new applications and kits designed to help teach programming coming out all the time. This is a post about the process we went through to create our own code-learning web app, Let’s Code! Along the way, we learned that it’s great to hack-start a project, but turning prototypes into products isn’t easy…
The story begins in April 2012. At this time there was an increasing amount of discussion here in the UK about the ICT (Information and Communications Technology) curriculum needing to be modernised. Consensus was growing that we were failing kids by teaching them only how to use software (like Microsoft Office) and not how to create it. The existing curriculum lacked the potential for creativity, it bored students and it put them off studying Computer Science in higher education. The result was an increasingly concerning skills shortage.
This troublesome situation wasn’t lost on our colleagues, who suggested that we - Pearson’s Future Technologies team - might try to do something to help. Since we’re a central R&D team inside the “world’s leading learning company”, it’s our job to prototype new concepts and explore new technology that may affect education. At one of our bi-annual “Future Technologies Champions” meetups, where we come together with our colleagues to generate ideas for, and decide on, our next projects, this idea was voted top. So it was decided: we would create an application to address the IT skills shortage and to help make ICT fun again.
Phase 1: Hack-starting (pre-alpha)
We decided to “hack-start” the project, using a hackathon-style format internally to kick things off quickly. We came together with some of our expert colleagues, including an ICT subject advisor, and hacked away together in a room for two days. Over the course of that time, we designed the basics of the app and created the first, quick prototype.
Some of the decisions we made in this short period of time were:
To make it as visual as possible and to foster creativity by allowing young people to create their own applications
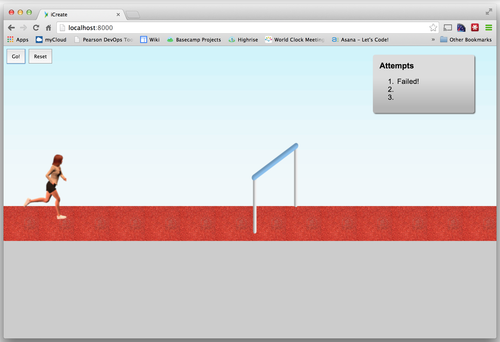
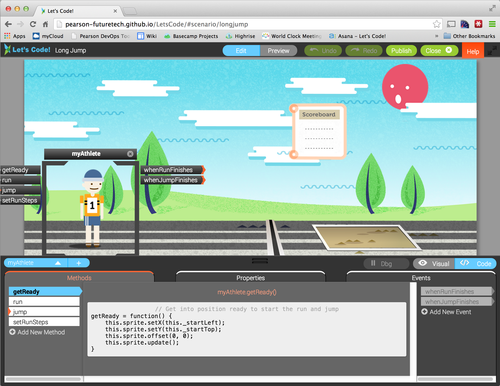
To base it around objects that have properties and can move, as part of real life scenarios that young people can understand and relate to. For example, the long jump in athletics (the London Games were just coming up back then!)
We spent most of the first day figuring out what we were going to do, but by the end of the second day we had hacked away with Easel.js and created a working long jump demo.
Although it was basically useless as an actual application at this point, it was really useful as a starting point, to convey what we were hoping to create (both to ourselves, and anyone we spoke to about it).
Phase 2: Prototyping (alpha)
Following the hack, we archived that code and started developing again from scratch. (There’s not much harm in throwing away just over a day’s worth of messy code!).
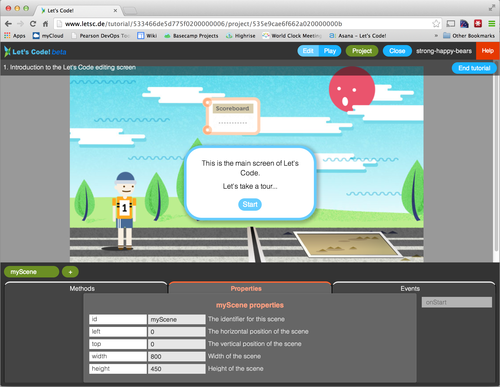
Over the course of the next few weeks, with help from Phil Powell who joined us for a few weeks as a contractor, we built an alpha using Backbone.js. It featured most of the core features for the app. It allowed objects to be added to the stage. You could edit their properties and see the effects. You could make events trigger things (e.g. hooking up a button click to make the athlete start running). It included key programming concepts: objects, properties, methods and events. We also had a couple of tutorials to guide the user through getting started, although you could go off-script and do your own thing too.
We got the site deployed for anyone to try out and made the code public on GitHub. We felt that we had conveyed the concept and we started to get some people excited about it.
It felt like our hardest work had been done.
The main problem was that there was no server side component at all. You couldn’t save your project and if you refreshed the page, you’d go back to the beginning! Also, we hadn’t spent much time on cross-browser testing and it didn’t work in Internet Explorer.
Phase 3: Productizing (beta)
We were all really keen to see our prototype live on and we wanted to learn as much as we could about developing an open source project, to see what lessons we could pass on to other business units in Pearson.
So we decided to spend more time to “productize” it, i.e. add the rest of the features it needed to be a minimum viable product. We’d need to add a server (we chose Node.js) and a database (we chose MongoDB) so we could store users and projects.
We’re used to creating prototypes (23 so far, and counting!) but this was Future Tech’s first experience trying to actually extend one, beyond our usual 8-10 week timeframe.
Naively, I wasn’t expecting it to be too difficult. I thought that we could simply build out the alpha and add more features. I did anticipate that we would need to do some refactoring as we went along, but I didn’t expect it to be that much work.
Starting again
Because we’re a very small team (just two developers) and always busy working on multiple new prototypes once, we had Edward Ruchevits - who had just joined us as a developer intern on a year out from university - take on most of the work on this productizing effort.
Edward is a super-smart and knowledgeable developer, but we really threw him in the deep end on this one! I think that, after being employed as a developer for a bit over a decade now, I had forgotten how difficult it is when you first start to work with other people’s code. Edward was also coding with most of the libraries and technologies (e.g. Backbone.js, Node.js, MongoDB) for the first time. Furthermore, as I was basically full-time on my next project, I wasn’t able to spend enough time with him. So, naturally, Edward didn’t get on well with our fairly messy alpha code. He decided to create a new version from scratch, confident that it would actually be quicker that way, because he would find it easier to work out how things were pieced together.
We were all concerned about starting over again, but we thought that we would be able to pull in code from the old version as we went along. Unfortunately, the codebase quickly diverged. As such, soon we weren’t able to pull in much of the old code at all.
All this meant that a lot of the effort for the beta went into rewriting features that we already had in the alpha. That was obviously quite frustrating for all of us.
Edward introduced some great improvements though. He adopted Marionette which helped to structure our Backbone code better. He switched to using HTML5 canvas for the stage, instead of DOM elements. And he realised that we didn’t actually need some of the nastiest code from the alpha, and was able to remove it.
But gradually we realised that we’d really underestimated the effort required…
Ramping up
Soon we knew that we’d need some extra help. We asked a London agency called Adaptive Lab to work on it with us for a few weeks.
Adaptive Lab helped to bring a more rigorous approach to development. They were conscientious about writing tests, they conducted code reviews and they were great at mentoring Edward.
A little later we were also joined by ThinkGareth, who dropped right in with great expertise in the technologies we were using, and he helped us all a great deal.
Debugging and wrapping up
Coming to the end of the time we had available, we started concentrating less on adding/restoring features and more on debugging.
At this time, we noticed one particular kind of bug kept rearing its head…
We’re using an Event Aggregator (Backbone.wreqr) to de-couple the various components of the app. Instead of calling other modules directly, you can fire an event which other modules can listen out for and respond to appropriately.
This is great, except we kept running into bugs caused by accidentally leaving old event listeners lying around. It’s easy to do; Marionette Views automatically unbind events you’ve hooked up with listenTo (as opposed to on) when you close the view. But you can’t do this with the Event Aggregator events; you have to remember to turn the listeners off in the view ‘close’ methods.
The problems that this caused were very hard to debug, because it really wasn’t obvious from the fairly random-looking multiple-firing effects, what the actual causes were. There might be something that could help with this now though: Chrome debugging tools now have the ability to inspect asynchronous call stacks.
Eventually, we fixed all the critical bugs that we had identified, pushed out the source code to GitHub, and made the new version live.
Lessons learned
So what did we learn from this experience?
Hack-start for the win
Hack-starting your project can be a brilliant way to kick things off. It’s amazing how many important decisions can be made in such as short space of time. Let’s Code! evolved further along the way, but we pretty much had the core concept figured out after just two days. From the direction that gave us, it was relatively easy to then create our 8-10 week ‘alpha’ prototype.
Prototypes != products
But going from prototype to product is harder. Don’t treat this lightly - it should be approached just as carefully as any production build.
Compared to quick hacks and prototypes, doing things properly takes a lot more time. For production apps (especially open source ones, where it’s essential that external developers can get up and running as quickly as possible), you need:
To think more carefully about the architecture
To adopt automated testing
To spend a lot more time on cross-browser testing and fixes
To write decent documentation
To use solid development practices, such as conducting code reviews
All of these things can slow down development, but they’re necessary to ensure the quality of the code, and therefore the app.
It’s hard to refactor, even harder to rewrite
Unless it’s just a few days’ worth of messy hack code, or you have a really good reason, prefer refactoring over rewriting (see also Joel Spolsky’s Things You Should Never Do!)
Experienced developers should lead the refactoring in a hands-on way, ensuring that newer developers are properly supported.
Get the infrastructure in place early
One of the things that’s a lot better with the beta is that we have a good infrastructure in place for things like linting, testing, building and deploying. Edward introduced Grunt for this. It was definitely worth putting this in place early - it’s saved us time each occasion we have deployed, and automated linting has picked up many issues along the way. Having a good set of tests in place is also invaluable if you’re doing lots of refactoring.
Test with real users early on
We benefitted from getting feedback from real users while development was still ongoing. Arun, our lead designer, surveyed a number of teachers and he visited schools to see it being used first-hand. It was very useful to understand their expectations and their reactions to the app.
We haven’t been able to address everything at this stage, but as we are able to develop it further, it should help us to focus on what’s most important.
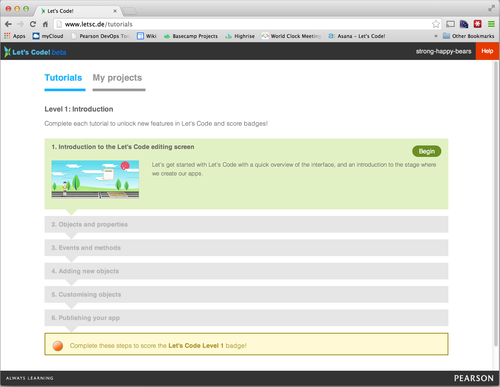
Try it out and grab the code
The Let’s Code! beta is now live for anyone to use. At the moment, the beta is still quite limited:
- You can only create projects via the tutorials
- There’s only three tutorials, based on a single scenario: the long jump
- The actual JavaScript code for methods is not yet editable (although you can view it)
However, we hope that it conveys the concept and you can imagine lots of ways that it could be extended.
It’s an open source project freely available on Github, to enable developers, including code-savvy teachers, to customise the app and add their own features, assets and tutorials. We hope to encourage the developer community to find fresh and creative ways to extend Let’s Code! and help more young people start learning how to code.
Whether you’re a teacher, student, developer, or just someone who’s interested to take a look, we’d love your feedback, so please try it out and let us know what you think!